|
Making exposures during the day |
|||
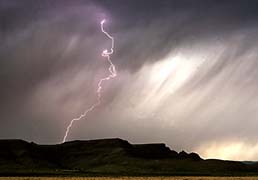
©1971 Joseph Matthews |
Capturing
lightning in the daytime, or any high ambient light situation, is extremely
challenging and requires skill, reflexes and even more luck than shooting
at night. You will need to get out in front of the storm and set up
in one of your scouted locations (or any place you can get a decent
shot). In the daytime, the rest of the composition becomes even more
important. But at least you can see what you're doing. Don't have any
scouted scenes yet? Shoot every daytime storm you can. This is one of
those practice, practice, practice kind of things.
Set up your equipment with your camera on the tripod, compose the shot, set the focus and lock it all in place. Caught away from home without your tripod? Try bracing in a car window or on top a fence post (that's what I used on the photo at left. Take a general meter reading with lots of sky. You need to underexposure a half to a full stop if you are shooting slides. The saturation that a full stop underexposure gives is preferable. Don't have the lens open wider than ƒ8, preferably ƒ11 (ISO 100 slide film). To gain even more control over ƒ-stop and time, try a slower film. Anything smaller that ƒ11 will start to weaken the exposure of the lightning bolt. For color negative film, go with the standard exposure and let the lab burn in the sky a little when they make your prints. It's best to have an exposure longer than 1/30th of a second. A neutral density filter won't help as it will reduce the lightning's exposure, too. Test your film and camera setup on a stormy sky. You want a lot of detail in the sky with enough density to make a lightning bolt stand out with contrast. But you also want good detail in the landscape part of your shot. Too much under exposure and you will wind up with a bizarre "day for night" look. Lock in your exposure. Don't let an automatic camera rob time by setting exposure at the time of the shot. Switch to manual mode. Study the types of bolts that are striking. Are they brief and scattered or long intense flickering bolts? Here is where that knowledge of how lightning works comes into use. Each lightning strike is a series of events, actually a series of fast strokes essentially in the same place. There is the growing charge differential that creates the need for lightning. Then, to start the process, a "leader" creates the path that successive flashes will follow by breaking down air resistance. The leader is not very visible emitting mostly near infrared. Then comes a series of strokes that actually travel back and forth between the charged area. If the storm’s lightning isn’t this multi-stroke type you probably won’t get a shot if you are manually triggering your camera. The flickering long duration strikes are the ones that give you time to react and shoot. They are also the reason you want as long of an exposure as it practical. If there is some duration to the strokes, then get ready with your finger on the shutter release (no cable release). Can you put some pressure on the shutter release, maybe half way down? This will turn the meter on in some cameras. Ignore it. You will waste some film learning this sweet spot on your button. Look up at the scene visualizing the field of view. You can try to watch the events through the camera but I've never had any luck doing this. Push the shutter release as soon as you even think you see a strike. Push at the slightest flicker even if its on the edge of your vision. This has to become instinctive with no hesitation. Yes, you will waste a ton of film. Don’t try to think if the bolt is in the frame or not, just "see flash, push." At some point you will have the shutter open during at least the last half of the strike and you will build your exposure. What you lose, but not always, is the beautiful branching that often happens early in the event. What you get is lightning in the presence of a greater scene. Try to stay relaxed while you stare down the storm and don't tense up. If holding pressure on the shutter release is a problem, try a "pinch" hold placing the thumb under the camera opposite your shutter finger. For me this lets me relax my arm a bit and has the advantage of countering the aggressive push against the shutter button you will tend to make while trying to react quickly. Some thoughts on auxiliary equipment: Cable releases - don't try to use the standard type in this situation. They will rob a few milliseconds compressing and transferring your shutter "push". An electronic one might work great.
|
Home | Gallery | How to photograph lightning | Safety | Bio |
|
©2002
ParkSites, All Rights Reserved Please feel free to contact us for commercial use of these photographs. |